
I love when my kids come home from school with artwork. Not only because it boosts their self-confidence when I proudly display it, but because, like photographs, the artwork is something tangible I can keep to remember different phases of their childhood. After it’s hung on the wall, fridge or sliding glass door for awhile, I pack it away. However, seasonal artwork I bring out every year, just like my mom still hangs up the paper Santa mobile and macaroni wreath I made in elementary school.

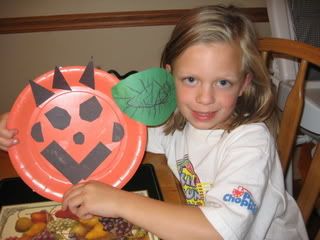
So today I thought I’d share a craft project my daughter made a couple years ago that I unpack and hang up every year at Halloween . . . the paper plate pumpkin. I like this craft not only because it’s festive, but because it helps younger children learn their shapes.
To make paper plate pumpkins you need:
- Orange paper plates (You can also color or paint a white plate.)
- Black, brown and green construction paper
- Glue
- Scissors
Then have your kids do the following:
1. Cut shapes out of the black construction paper to decorate the pumpkin’s face.
(My daughter cut 3 triangles for hair, 2 rectangles for the mouth, 2 hexagons for eyes, 2 semi-circles for ears and 1 circle for the nose. Be creative!)
2. Glue the black shapes on the plate to create the pumpkin’s face.
3. Cut out a leaf from the green construction paper and glue it on.
4. Cut a rectangle from the brown construction paper for the stem and glue it on the pumpkin.
Once your child has completed their paper plate pumpkin, put their name and date on the back so you’re all set to hang it up every Halloween!
Popularity: 24% [?]


If you liked this article, please... |
|||||
| Subscribe Via Email | Subscribe Via RSS | Add to Technorati | |||


Discussion
What do you think? Leave a comment. Alternatively, write a post on your own weblog; this blog accepts trackbacks [trackback url].
Comment Policy
Leave a Reply
If you liked this article, take more To Go...